Contents
Overview
The built in notification system, first ever in Joomla, allows your app to keep the user (or group of users) informed about various different events. Think of notifications as important alerts that user would be interested to read and keep track of it.
Notifications can be generated everywhere. In your component or plugins and later displayed inside JomSocial notification system.
This tutorial will show you how, but since we do not have idea of any third-party component we could use :) the examples will be done on a community plugin which will be triggered at onAfterProfileUpdate event
If you don't know how to create plugin which will be triggered on this event, we suggest you to check this guide
Implementing it in your component anyway
As stated in overview of this tutorial, we will generate notifications using community plugin.
You will most likely want to create notifications inside your component, or your plugin. The following tutorial will work in any of this cases. You only need to determine at what point in your code the notification will be created and just load the JomSocial Core Libraries file.
require_once JPATH_ROOT .'/components/com_community/libraries/core.php';
Following the tutorial explained bellow will work just fine for your extension too
Preparing the Development Environment
1. We will assume that you're already created community type example plugin which will be triggered when user changes its profile
If not, you can download empty example plugin from this link, install it in Joomla and enable the plugin. It is named Community - Notifications Example
2. Navigate to your database and empty these two tables, so they dont have any records at all
- a) prefix_community_notification
- b) prefix_community_mailq
- a) prefix_community_notification
3. Have at least two (2) users at your test sites and know their ID's

In earlier versions of Joomla, user ID's have always started from specified number (62, 42) In Joomla 3, this number will be random, hence, the picture of our testing environment because it will definitely be different at your end.
The First Notification
Open the plugin php file which will be located in ROOT/plugins/community/example
Within the function onAfterProfileUpdate() replace the
// do the magic here
with
CNotificationLibrary::add( $cmd , $actor , $target , $subject , $body , $template , $params );
As shown on the example, notification add api have 7 parameters
- $cmd - is the notification type. You can see all notifications types in this file. ROOT/components/com_community/libraries/notificationtypes.php starting from, or around line 53. We recommend using system_messaging notification type.
- $actor - is the person who carry out the action
- $target - is the person, or group of people that will receive notification
- $subject - is the notification subject, in both, notification popup window and the email title
- $body - is the body of email notification message
- $template - if you need specific template to use, you can define it here. Otherwise, this parameter can be empty
- $params - custom defined parameters
Knowing all this, lets define the variables we will use
Change your plugin code to:
$user = CFactory::getUser();
$cmd = 'system_messaging'; // first param, type of activity
$actor = $user->id; //second param - get the id of $actor
$target = '965'; // third param. Who receive notification? In our dev environment, its admin user with id 965. At your environment, you will most likely want to get the ID from your object or from array of users.
$subject = 'Notification Subject'; // Subject of both, email and popup notifications
$body = 'This is the notification body message'; //Body message in emails.
$template = ''; // If you need to use specific jomsocial template file, you can define it here.
$params = new CParameter(''); // We want to create an additional params object, and assign data to it, without having to formally define a class
CNotificationLibrary::add( $cmd , $actor , $target , $subject , $body , $template , $params );
Now login with any user and change the profile information. Lets go to database to see what happened.
Navigate to prefix_community_notifications table and observe the new record

Navigate to prefix_community_mailq table, and see the new record

Potential Code Bloat
Above example is fine, and it works, but generally it is not recommended to use it like that. Instead, it could be written like this
$actor = CFactory::getUser();
$params = new CParameter('');
CNotificationLibrary::add( 'system_messaging' , $actor->id , '965' , 'Notification Subject' , 'This is the notification body message' , '' , $params );
This is much cleaner and easier to follow while basically doing absolutely same thing as a code shown above.
Custom Notification Parameters
A notification API can be extended with any param you would like to add.
These params can be passed to either email template, notification, and of course, language file.
$actor = CFactory::getUser();
$link = 'http://www.google.com';
$params = new CParameter('');
$params->set('actor', $actor->getDisplayName()); // can be used as {actor} tag
$params->set('actor_url', 'index.php?option=com_community&view=profile&userid=' . $actor->id); // Link for the {actor} tag
$params->set('url', $link); //url of the whole activity. Used when hovering over avatar in notification window. Can be used as {url} tag in outgoing emails too. Make sure that you have defined $link variable :)
CNotificationLibrary::add( 'system_messaging' , $actor->id , '965' , 'Notification Subject' , 'This is the notification body message' , '' , $params );
- $params = new CParameter(); - We want to create a new params object, and assign data to it, without having to formally define a class.
- $params->set('actor', $actor->getDisplayName()); - Your notification should always have an actor. This param can be passed to template as {actor} tag. In notification window, it defines the user that carries an action.
- $params->set('actor_url', 'index.php?option=com_community&view=profile&userid=' . $actor->id); - Actor URL is usually the url of an actor. In notification popup, it adds the link to the {actor) element
- $params->set('url', $link); - This is most important paramater you must always set properly. In notification window, this param is used over the avatar image. In email notification, it echoes the location where activity occurred.
Adding Language String and Use Params
Having the params we just set are available to be used in our language files as well.
Lets define the language keys by altering the 'CNotificationLibrary::add() API
CNotificationLibrary::add( 'system_messaging' , $actor->id , '965' , JText::sprintf('PLG_COMMUNITY_EXAMPLE_SUBJECT') , JText::sprintf('PLG_COMMUNITY_EXAMPLE_BODY') , '' , $params );
The language file should look like this
PLG_COMMUNITY_EXAMPLE_SUBJECT="{actor} updated profile"
PLG_COMMUNITY_EXAMPLE_BODY="Hi Admin \n This is the mail to inform you that {actor} updated profile \n\n If you want to go to Google, click here \n a href="_QQ_"{url}"_QQ_">{url}</a>"
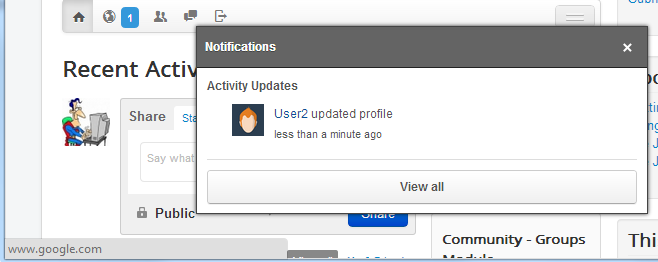
In this example, we have used the tag {actor) and {url} to pass the data to both, notification, and email templates. Lets see how does that look.
In notification window when hovering over avatar, notice the {url} param kicked in and adds the link to google over avatar. It is intentional , because we made it that way :)
 ]
]
In the same window, when hovering over actor link. This is the part where {actor} echoed the user that carries an action, while {actor_url}' taken care that object is linked properly

Lets see what happens in the email queue

And finally, the actual email that is sent to end user

Success
Till now, we created three (3) parameters that are successfully used in notification window, and emails.
- (actor) - Returns the username of the user which carries the action
- {actor_url} - Gives the <a href=""> attribute to the {actor}
- {url} - Is not mandatory, but you should always have it in your notification. It is the main url where action that we are notified about happened.
Similarly, you can define '
- {target} - if you need it
- {target_url} if you need it in your notification.
- (title) - Commonly used to refer to an object that generated notification. Example: "User X posted new photo in Album Y." Album Y is title here
- {title_url} - As with previous ones, the url of an object that generated notification.
- {message} - This param can be used to set (and echo) the message in the body of JomSocial email.