This page is not complete
This article is incomplete, or otherwise not finished. It could provide much more information about the topic that it tries to cover.
Are you interested in helping us making best documented Joomla! extension in the world and finish this article?
Then click here to find out how.
This page will be available soon
One of the JomSocial Team members is working on this page to deliver the best documentation article that could possibly be. Are you interested in helping us making best documented Joomla! extension in the world and write this article faster? Then click here to find out how.
Contents
Overview
Starting a website usually begins with choosing your hosting provider, as a most important thing a website couldn't work without. We often look into hosting providers that offer us a various different packages ranging from very small and usually pretty limited shared servers to pricey super-machines. We care how many storage we get, how much of the monthly bandwidth we can use, how many emails we can create, does hosting comes with CPanel and WHM, but one thing that we so often get frighten about is a "self managed server". We commonly believe that self-managed servers are something universally reserved for sites that can afford dedicated administrators to maintain the server environment. For the most part, that was the case, but not anymore, and you shouldn't be afraid to try it out.
Requirements for a JomSocial based site
Before even starting a website, we need to know what exactly do we need. Specifically for JomSocial, list is as follows
- Web server - Apache or a nginx (pronounced as ENGINE X). It is totally up to you which one to use. In this article, we will focus on Apache, as it is way easier to configure.
- PHP Environment - Although Joomla! and hence JomSocial system requirements are very generous on PHP version, we want to use the latest one, which at the time of writing this article is PHP 5.5.16
- Database Server - MySQL or recently very popular MariaDB. Whatever you use it will work the same.
- Email Server - for sending out the emails from your site.
- Cron Job - On every linux machine, cron jobs run as a system level process and is natively available
- Optimization modules and handlers - We also need something to keep our website fast and ready for great performance. For this guide, we will use mod_pagespeed from Google, opcache that is built into PHP 5.5 and Memcached. APC is not supported in PHP 5.5 because opcache comes as native layer and replacement for APC.
That is everything you need to kickstart a good hosting server. You might later want to install FFMPEG for video converting or additional PHP modules and extensions, which you will be able, because server that we are going to create is going to be self-managed, meaning, you will be your own server administrator.
What with the CPanel, WHM, PhpMyAdmin?
All of these are just a Graphical Interfaces helping you to set things without having to know anything about web server administration. They are commonly given as a courtesy on the shared hosting, but for a VPS or faster you need to pay extra for it. The fact of the matter is, none of them are needed for your web server, database server, or site itself to work. These panels only add extra clutter on your server and the things can work quite happily without it.
Chip in with 5 bucks and be amazed
So, lets get straight to business. Where is that super server for $5 we are talking about?
It is located on the Digital Ocean.
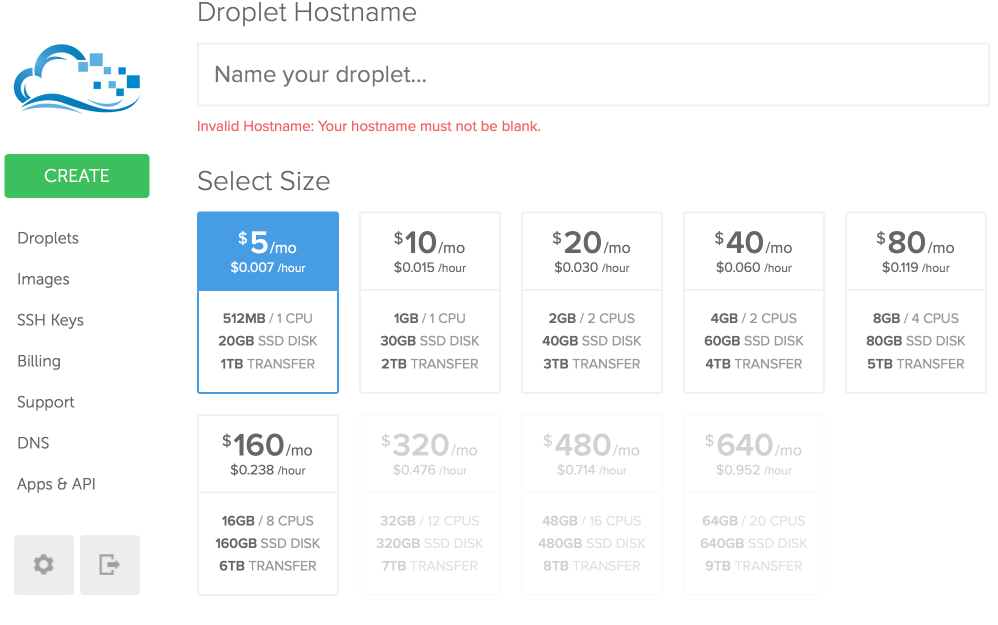
Login, and pay $5 which is minimum you need to launch the most basic droplet
As you can see, for just a $5 you get 1CPU, 512MB of RAM 20GB Solid State Disk and 1TB of transfer which is off the bat the better deal than anything you can find. Ofcourse, later you can easily increase your package. With minimum downtime, DigitalOcean does provide this possibility.
Give a name to your droplet, pick the package and the region that is closest to you,
You can leave "Available settings" unthicked
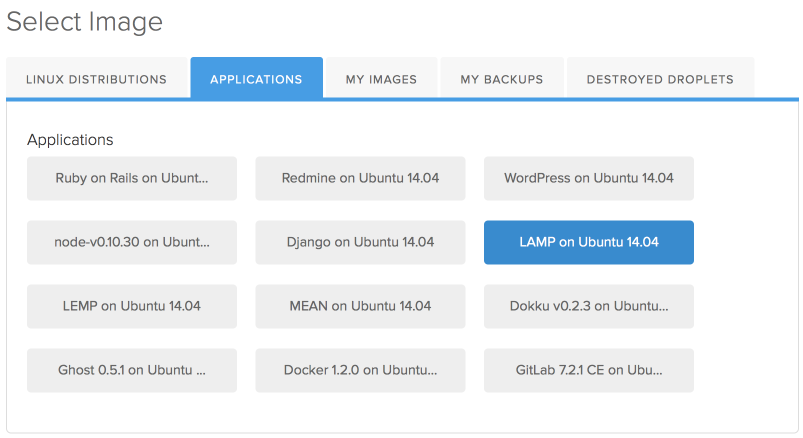
On the "Select image" area, switch to "Applications" tab and select "LAMP on Ubuntu 14.04"
LAMP stands for Linux, Apache, MySQL, Php and will automatically install all of these instead of you. It will save us some time installing the stack server that is available in Ubuntu.
Finally, create your droplet. Digital Ocean will immediately send you the email sending the
- IP address - you will use this to login at your server
- Root username - typically root
- Root password - Random string of text and numbers. You will be prompted to change this after first login


