This tutorial will help you to create multilingual community with JomSocial using only Joomla! multilingual feature - no 3rd party extensions are needed.
Contents
- 1 Introdution
- 2 A. Installing Joomla! language packages
- 3 B. Installing JomSocial language files
- 4 C. Setting content languages
- 5 D. Enabling language plugin
- 6 E. Enabling language switch module
- 7 F. Creating multilingual menu structure
- 8 G. Creating menu modules for each language
- 9 What can't be translated?
- 10 See Also
Introdution
JomSocial is using "JomSocial Toolbar Menu" for internal communication so all menu items within it doesn't have own menu item ID. It's inherited from parent menu item - usually it's JomSocial home/frontpage - that is located outside "JomSocial Toolbar Menu". That may cause issues when you want to have links in site main menu to certain JomSocial pages AND multilingual community.
Joomla! documentation says that you need to create separated menu for each language - that means you'll have few different menu items linking to the same page in JomSocial (each for different language). That will cause redirection/linking issues as JomSocial will take the lowest menu item ID for certain page. So if you are in language (e.g English) and click in "JomSocial Toolbar " certain link - you may be redirected to home page, or receive error notice (404 error page) or language will be switched involuntary (to e.g German) .
It's because menu item with lowest menu item ID is restricted to certain language only and Joomla! will try to load it even if your in different language.
So to avoid that we need to take a special approach. But first things first.
A. Installing Joomla! language packages
1. You'll need to install all necessary languages packs for Joomla! To do that browse to Backend -> Extensions -> Language Manager -> Install language.
2. Click "Find languages", Joomla! will reload page and create list with available languages.
3. Type in language name in search box and click search.
4. Check your language pack and click "Install".
5. Repeat these steps for every language you'll need.
B. Installing JomSocial language files
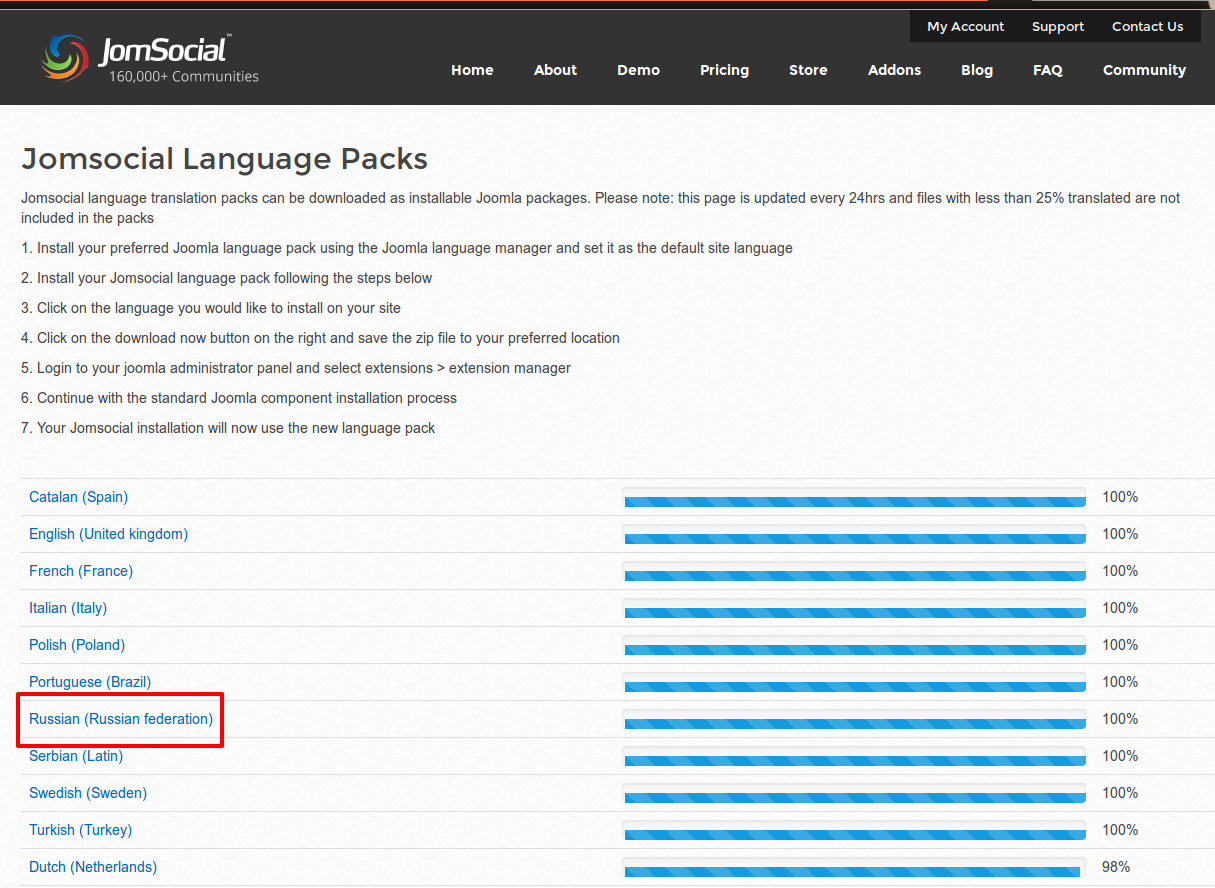
1. Browse to Jomsocial Language Packs.
2. Choose your language by clicking it. Please note the language packs are provided by Community Volunteers.
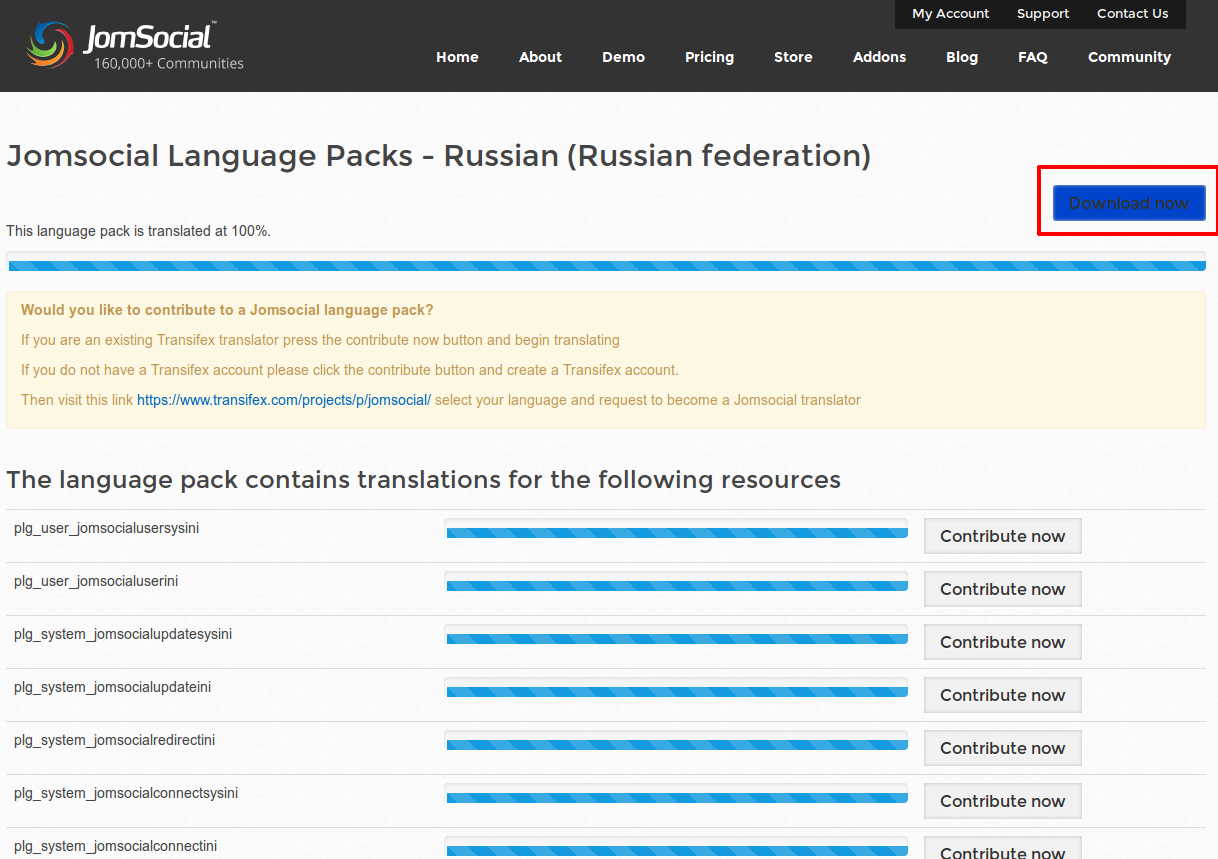
3. Click "Download now" in upper right corner.
4. Save the file on your hard drive.
5. Browse to Backend -> Extensions -> Extension manager.
6. Choose language package and click "Upload & Install".
7. Language pack for JomSocial will be installed.
8. Repeat those steps for every language you need.
C. Setting content languages
1. Browse to Backend -> Extensions -> Language Manager -> Content
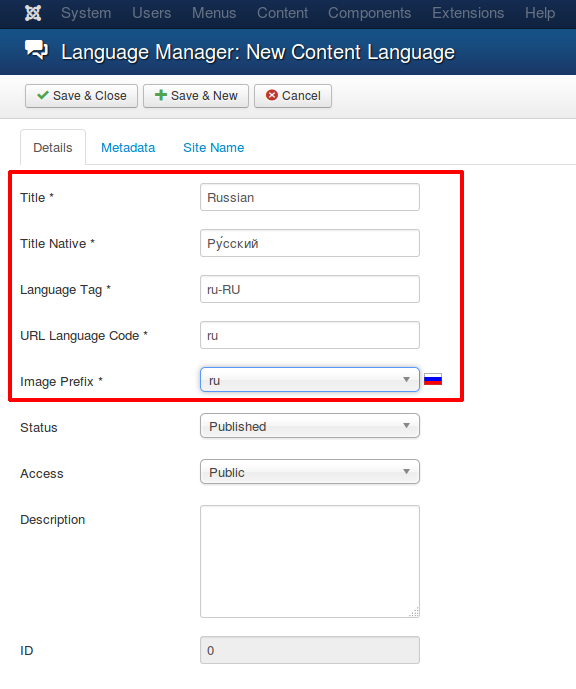
2. Click New and fill the form (hover over field names to display tips). You may add additional (translated) site meta tags and site title.
3. Click "Save & Close".
4. New language will appear on content language list.
D. Enabling language plugin
1. Browse to Backend -> Extensions -> Plugin manager.
2. Type "lang" into search field and click "Search".
3. Enable "System - Language Filter" plugin.
E. Enabling language switch module
1. Browse to Backend -> Extensions -> Module manager.
You may not have "Language switch" module on your module list by default. Type "lang" to search box to make sure if module is present on the list. If yes - skip steps 2-3, if not - follow further steps.
2. Click "New" button.
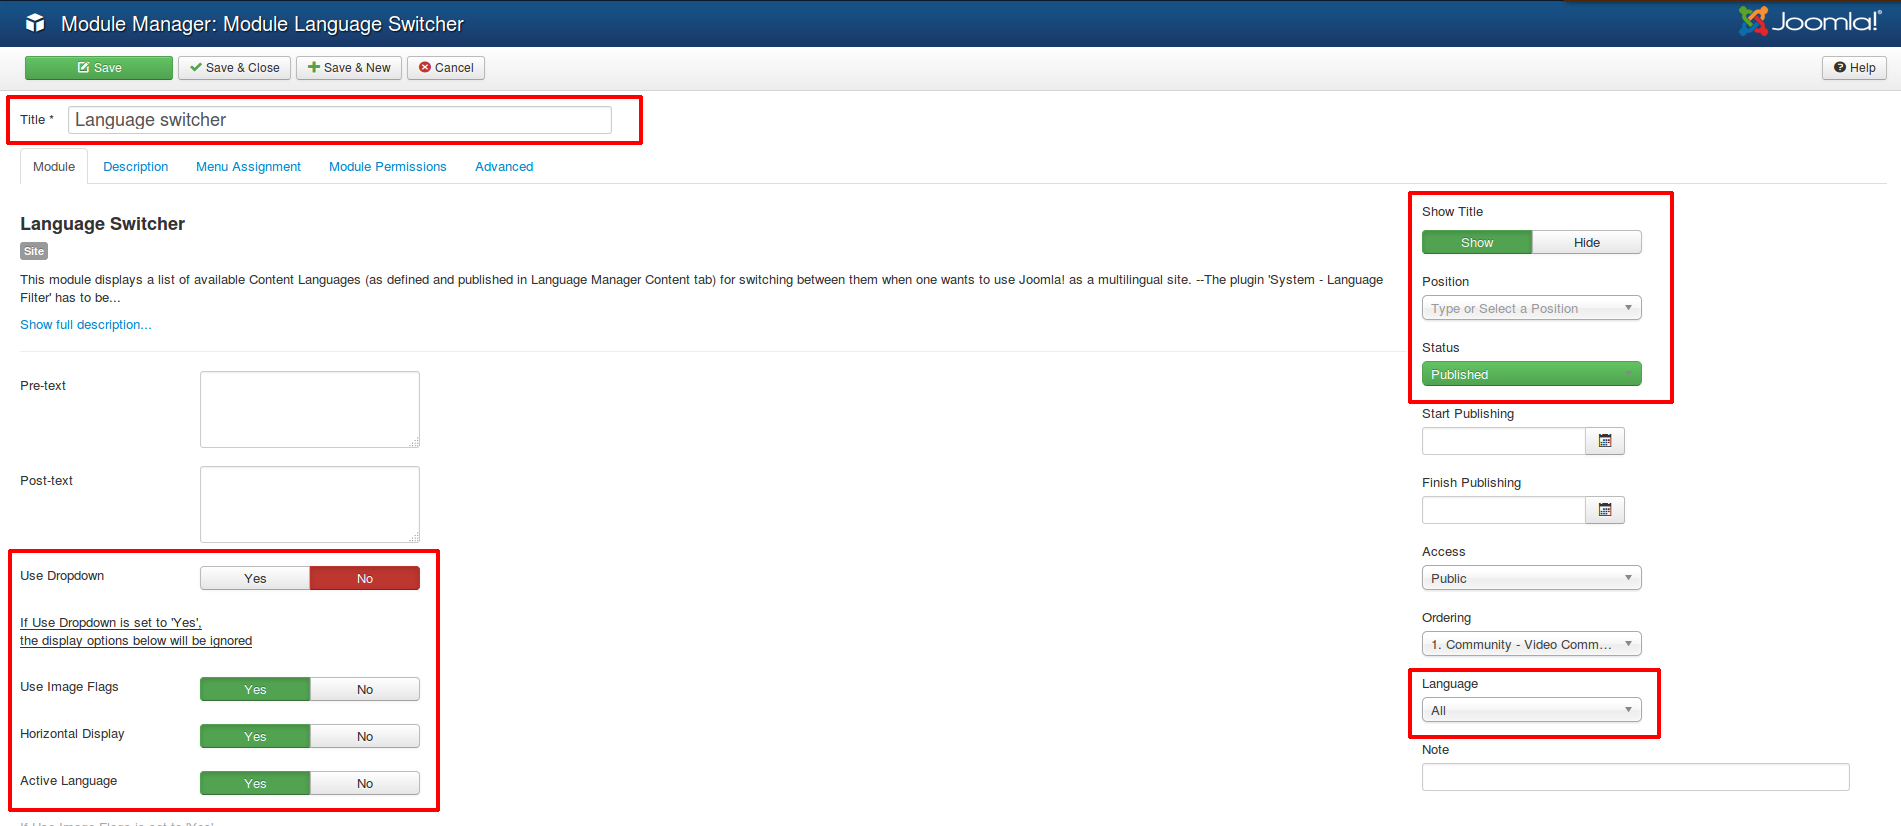
3. Look for "Language Switcher" module on the list and click on it. You'll enter module edit mode.
4. Set module title, decide if you want to display module title, assign module to module position and menu items (standard module settings procedure).
5. Save your changes by clicking "Save & Close".
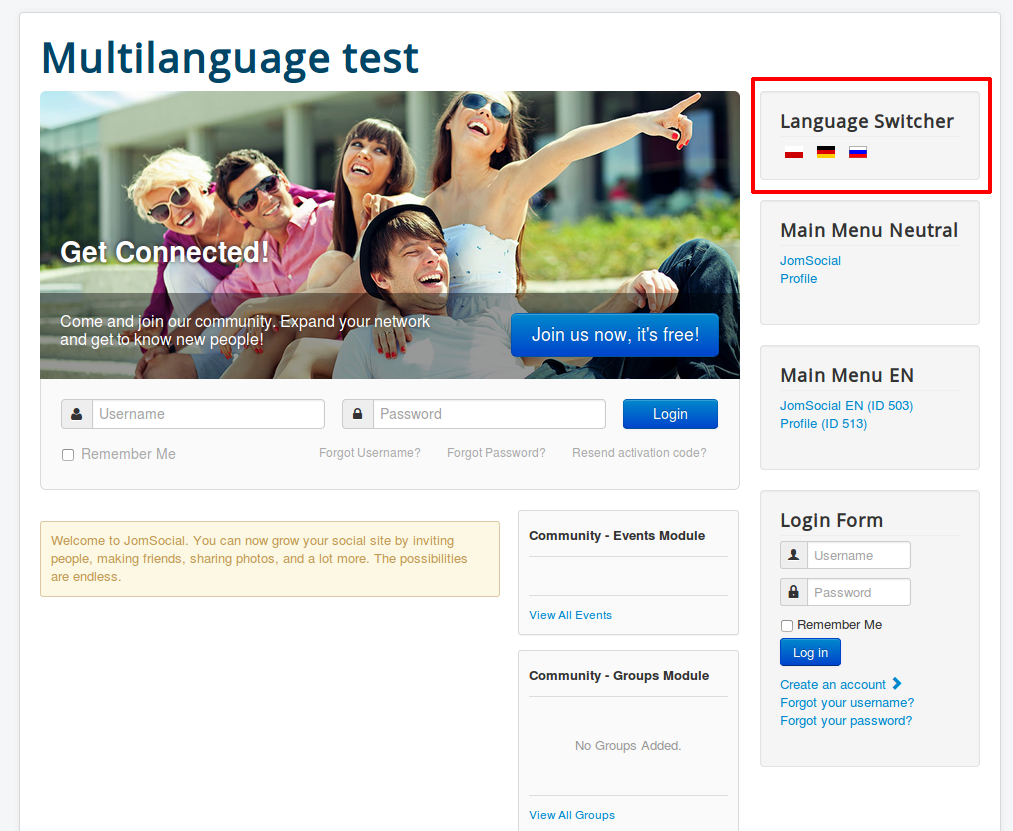
6. Browse to frontend to see Language Switcher module:
1. Browse to Backend -> Menus -> Menu manager
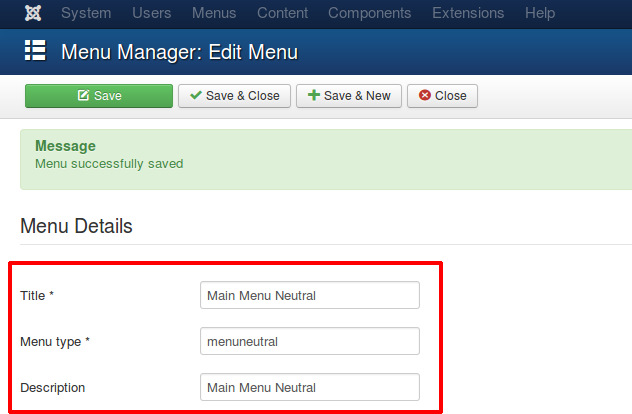
2. First we need to create NEUTRAL menu. Items in that menu will have no language restrictions and will be displayed for all languages. Save your changes by clicking "Save & Close".
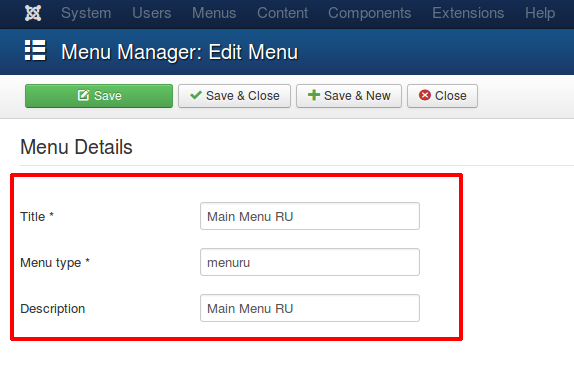
3. Create menu for each language. Save your changes by clicking "Save & Close".
Now comes tricky part: FIRST you need to create menu structure in NEUTRAL menu. it's because menu items created first will have low menu item ID what is crucial for JomSocial navigation.
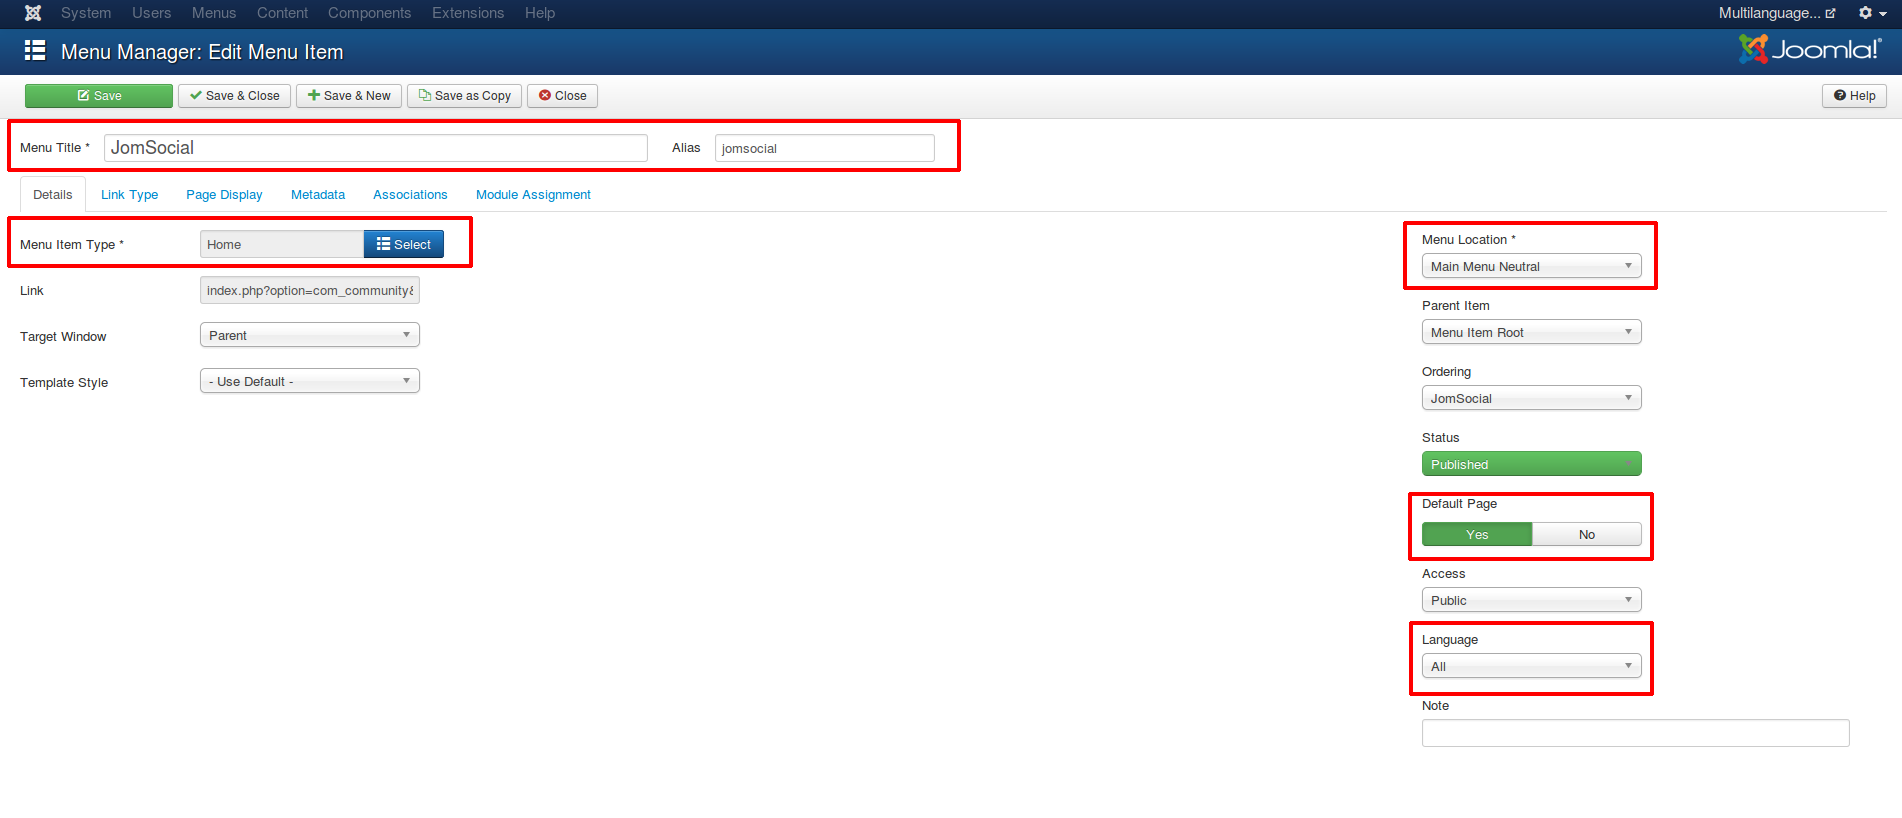
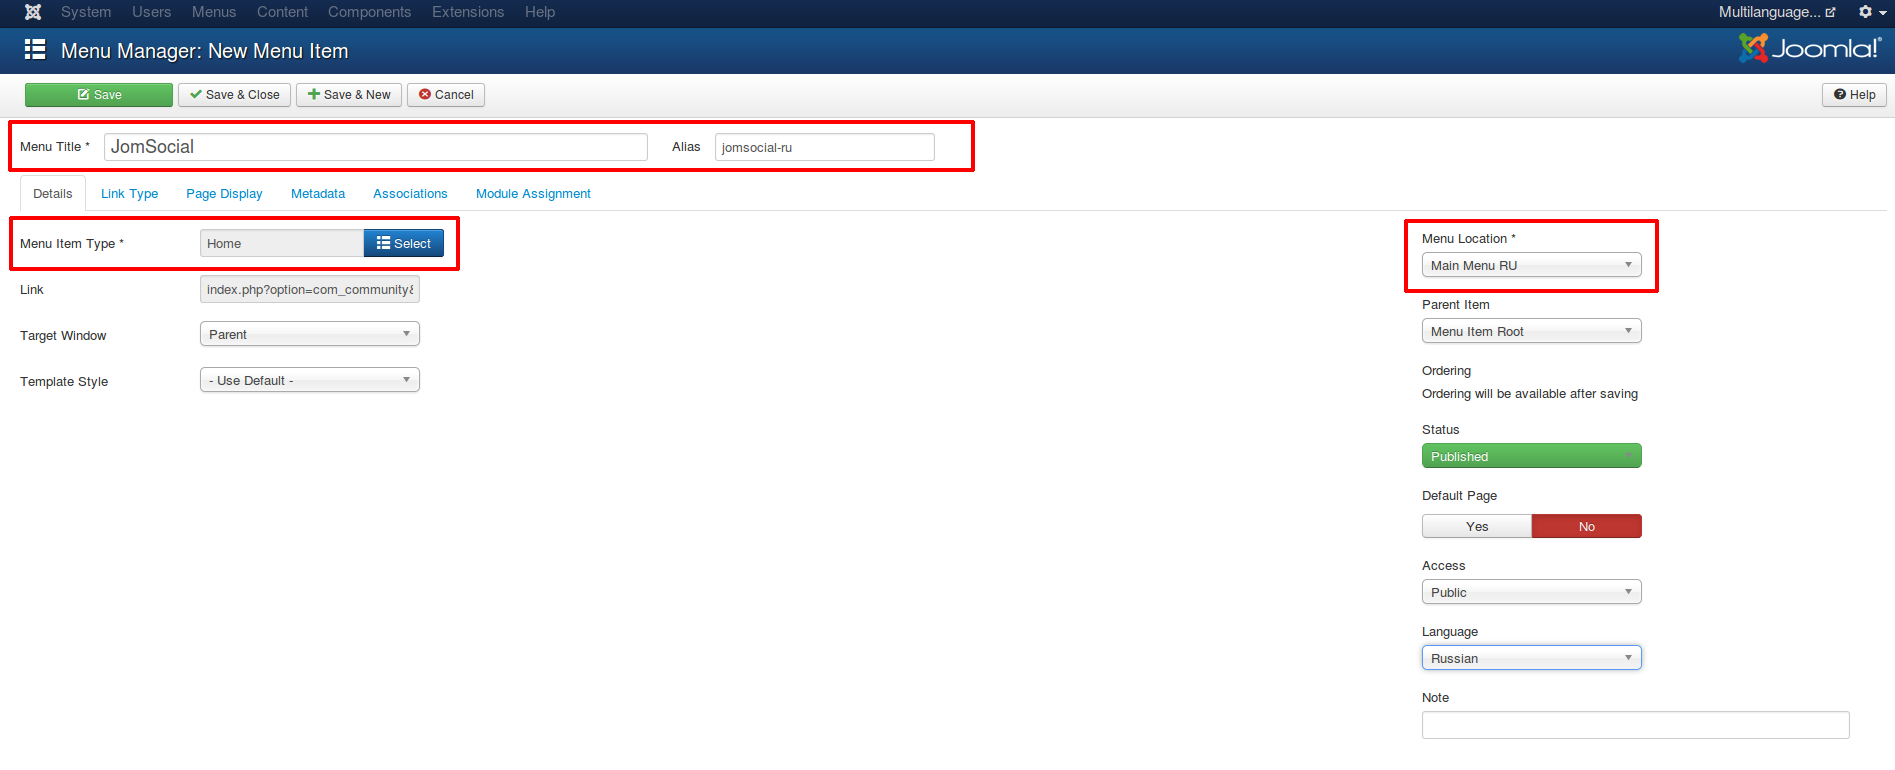
4. Create JomSocial home/frontpage menu item in NEUTRAL menu. Give it a title, unique menu alias, choose Community -> Home as menu item type. DON'T SET LANGUAGE FOR IT. Save your changes by clicking "Save & Close".
5. Properly set menu item should look like this:.
6. Create JomSocial home/frontpage menu item in FIRST LANGUAGE menu. Give it a title, unique menu alias (it may contain language marker e.g "jomsocial-ru"), choose Community -> Home as menu item type. SET LANGUAGE FOR IT. Save your changes by clicking "Save & Close".
7. Set it as "Default" (start) menu item by clicking star button.
8. Star button will be replaced by language flag.
9. Repeat above steps for each language menu.
Now, it may be that you'd like to have some menu items in site menu that links straight to certain JomSocial pages. In that case you'll need to create menu items that link direct to that page. BUT you must remember about "lowest menu item ID rule" so ALWAYS start with creating menu item in NEUTRAL menu. For example I'd like to create menu item that will link to profile page.
10. Browse to your NEUTRAL menu.
11. Click "New" button in order to create new menu item.
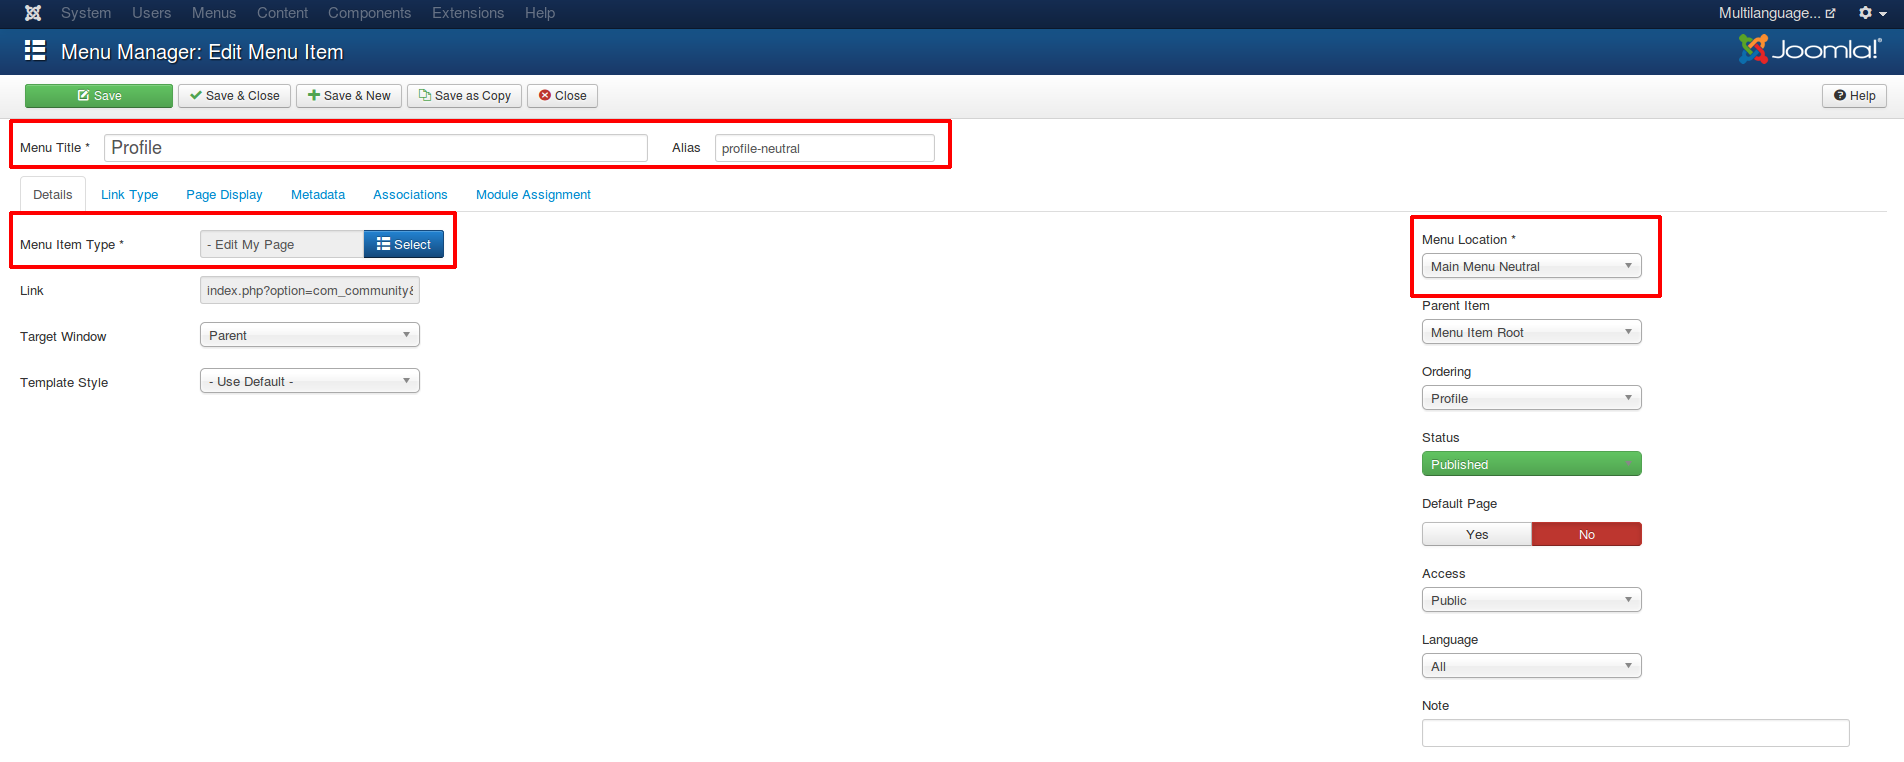
12. Give it a title, unique menu alias (it may contain language marker e.g "profile-neutral"), choose Community -> Profile as menu item type. DON'T SET LANGUAGE FOR IT. Save your changes by clicking "Save & Close".
13. Your NEUTRAL menu should look like this:
14. Now you may create menu item for your language menus.
15. Browse to your LANGUAGE menu.
16. Click "New" button in order to create new menu item.
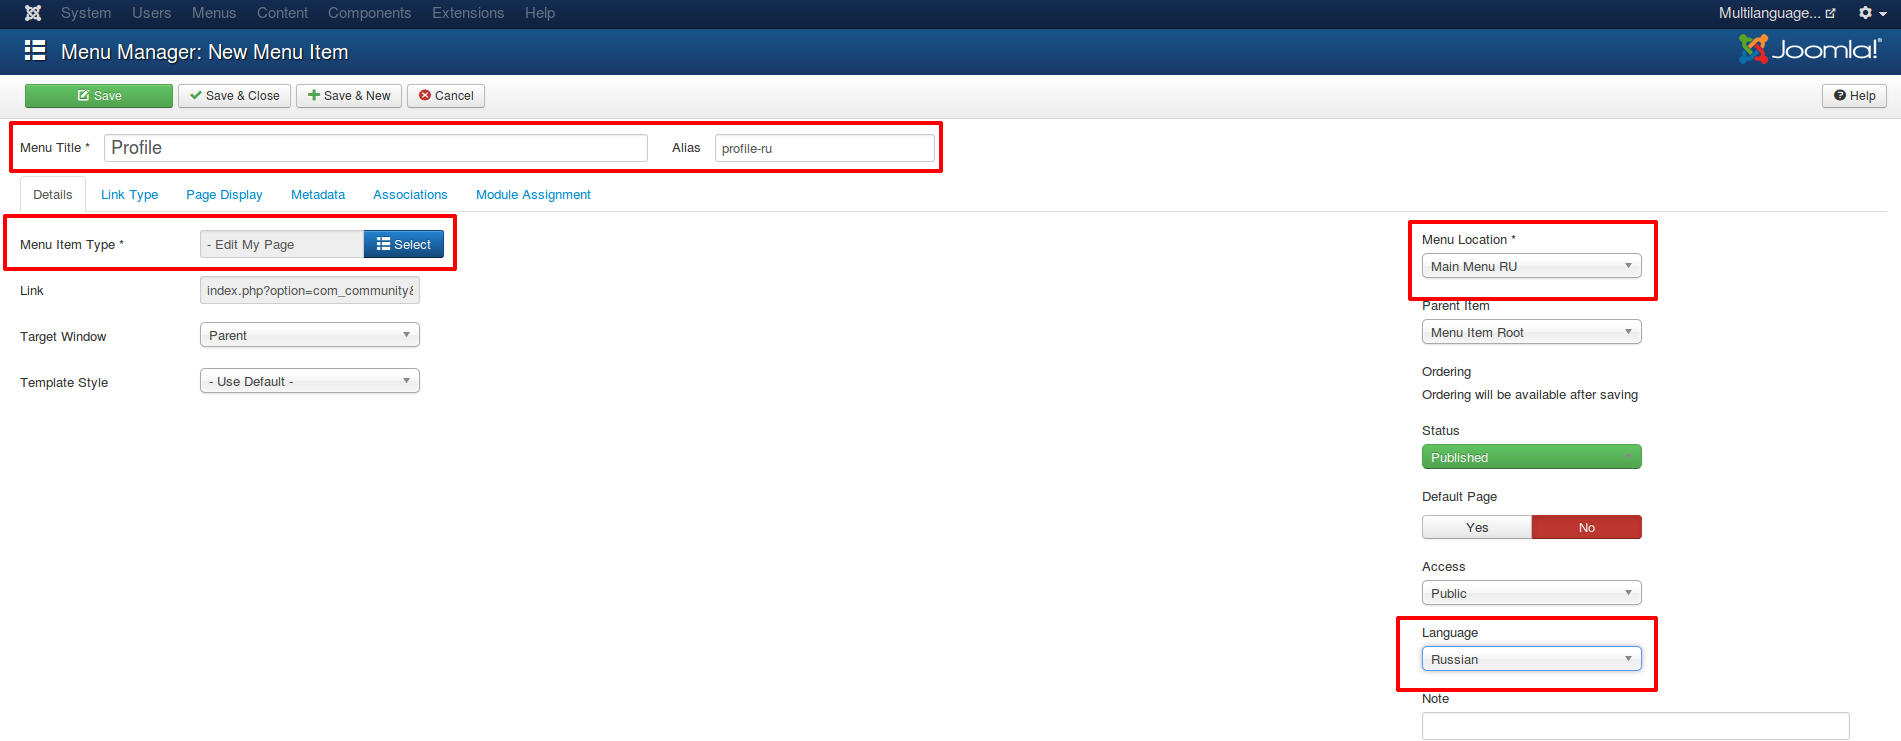
17. Give it a title, unique menu alias (it may contain language marker e.g "profile-neutral"), choose Community -> Profile as menu item type. SET LANGUAGE FOR IT. Save your changes by clicking "Save & Close".
18. Your LANGUAGE menu should look like this:
19. Repeat above steps for each language menu.
1. Browse to Backend -> Extensions -> Module manager
2. Click "New" button
3. Look for "Menu" module on the list and click on it. You'll enter module edit mode.
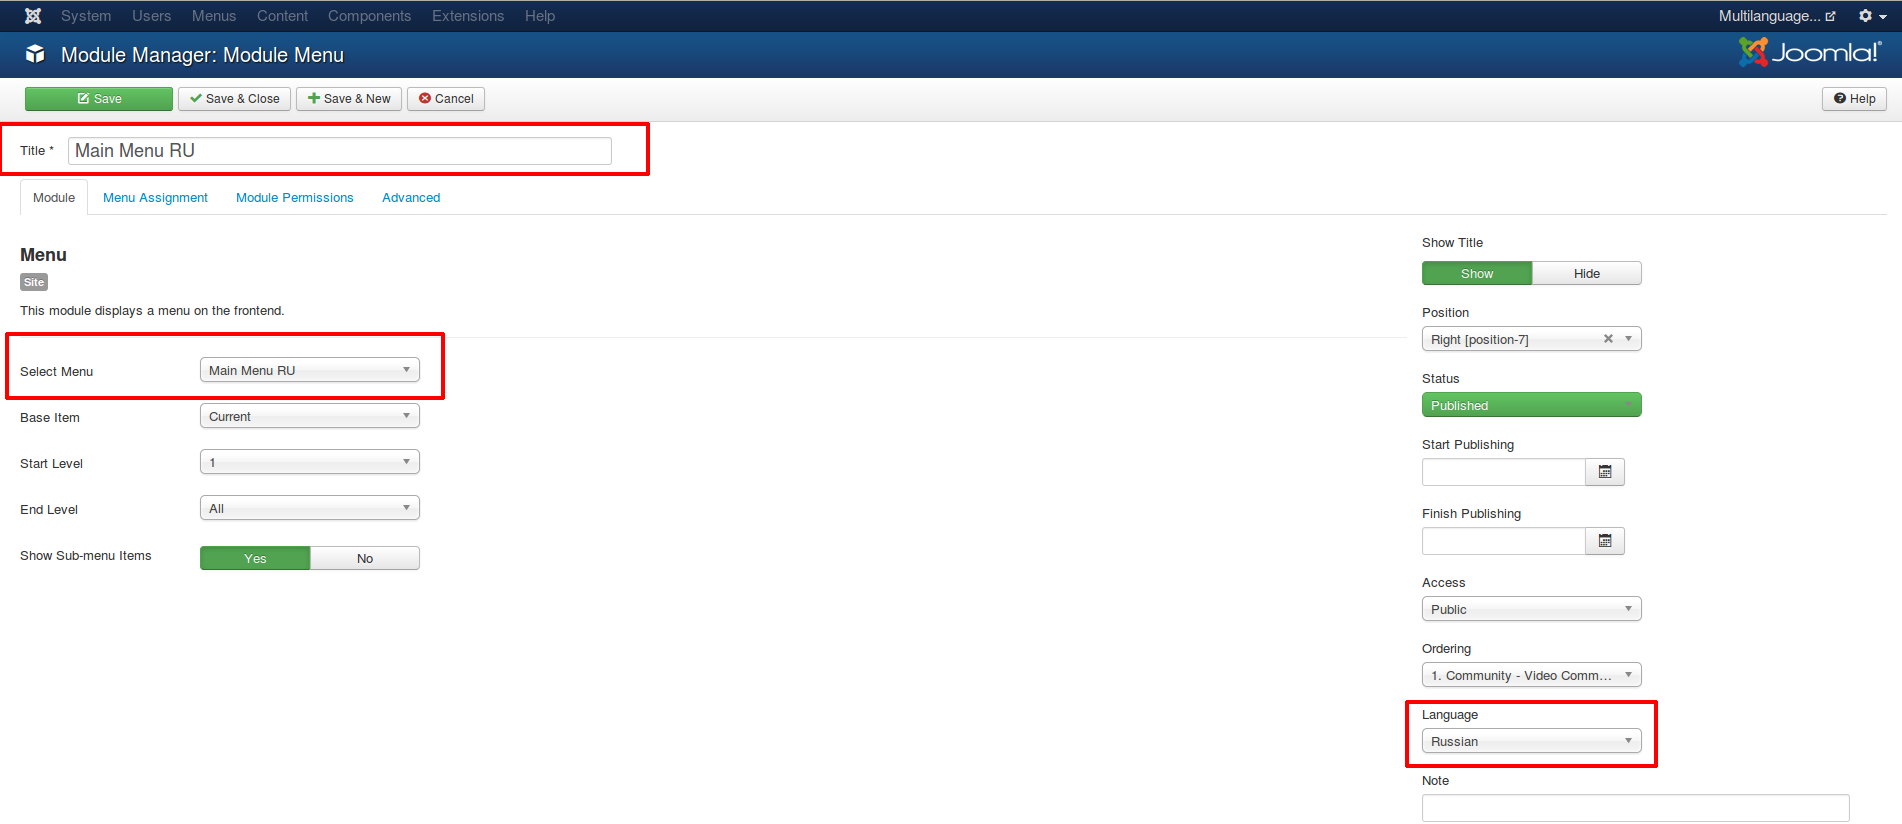
4. Set module title (it may contain language marker e.g "Main Menu RU"), choose right language menu in "Select menu" field, assign it to module position (standard module settings procedure). Set language that corresponds with that menu. Save your changes by clicking "Save and Close".
That's all, now you have Joomla! and JomSocial in full multilingual mode. You may also want to translate JomSocial toolbar, please follow the link in "See Also" section.
What can't be translated?
Switching language will not translate any member made content. Using this method you'll NOT create separated (by language) community streams/boards. If your users decide to use their own language in posts and activities it will be displayed with original language even if you switch to other language.
See Also
- Translate Toolbar - for translating JomSocial toolbar
- Translate Elements - for translating every JomSocial Element such are Custom Profile Fields, Groups, Video and Event Categories
- Changing Single Sentence or Word


