Sinisakrisan (Talk | contribs) (→Requirements for a JomSocial based site) |
Sinisakrisan (Talk | contribs) (→Chip in with 5 bucks and be amazed) |
||
| Line 19: | Line 19: | ||
== Chip in with 5 bucks and be amazed == | == Chip in with 5 bucks and be amazed == | ||
| + | [[File:Digitalocean10free.png|link=https://www.digitalocean.com/?refcode=db5c4ca59447|right|frame|$10 free credit to drive your server for 2 months]] | ||
So, lets get straight to business. Where is that super server for $5 we are talking about?<br/> | So, lets get straight to business. Where is that super server for $5 we are talking about?<br/> | ||
It is located on the [https://cloud.digitalocean.com/login Digital Ocean].<br/> | It is located on the [https://cloud.digitalocean.com/login Digital Ocean].<br/> | ||
| Line 36: | Line 37: | ||
* '''Root password''' - Random string of text and numbers. You will be prompted to change this after first login | * '''Root password''' - Random string of text and numbers. You will be prompted to change this after first login | ||
You will see something like this once your droplet is created | You will see something like this once your droplet is created | ||
| − | :::[[File:Droplet-finish.png]] | + | :::[[File:Droplet-finish.png]] |
==First login on the server== | ==First login on the server== | ||
Revision as of 04:56, 13 October 2015
Contents
- 1 Overview
- 2 Requirements for a JomSocial based site
- 3 What with the CPanel, WHM, PhpMyAdmin?
- 4 Chip in with 5 bucks and be amazed
- 5 First login on the server
- 6 Setup MySQL
- 7 Update software and edit php.ini
- 8 Additional Modules and Cache handlers
- 9 Setup Mail Server
- 10 Install and configure Joomla
- 11 Conclusion
- 12 Resources
Overview
Starting a website usually begins with choosing your hosting provider, as a most important thing a website couldn't work without. We often look into hosting providers that offer us a various different packages ranging from very small and usually pretty limited shared servers to pricey super-machines. We care how many storage we get, how much of the monthly bandwidth we can use, how many emails we can create, does hosting comes with CPanel and WHM, but one thing that we so often get frighten about is a "self managed server". We commonly believe that self-managed servers are something universally reserved for sites that can afford dedicated administrators to maintain the server environment. For the most part, that was the case, but not anymore, and you shouldn't be afraid to try it out.
Requirements for a JomSocial based site
Before even starting a website, we need to know what exactly do we need. Specifically for JomSocial, list is as follows
- Web server - Apache or a nginx (pronounced as ENGINE X). It is totally up to you which one to use. In this article, we will focus on Apache, as it is way easier to configure.
- PHP Environment - Although Joomla! and hence JomSocial system requirements are very generous on PHP version, we want to use the latest one, which at the time of writing this article is PHP 5.5
- Database Server - MySQL or recently very popular MariaDB. Whatever you use it will work the same.
- Email Server - for sending out the emails from your site.
- Cron Job - On every linux machine, cron jobs run as a system level process and is natively available
- Optimization modules and handlers Not Required - We also need something to keep our website fast and ready for great performance. For this guide, we will use mod_pagespeed from Google, opcache that is built into PHP 5.5 and Memcached. APC is not supported in PHP 5.5 because opcache comes as native layer and replacement for APC.
That is everything you need to kickstart a good hosting server. You might later want to install FFMPEG for video converting or additional PHP modules and extensions, which you will be able, because server that we are going to create is going to be self-managed, meaning, you will be your own server administrator.
What with the CPanel, WHM, PhpMyAdmin?
All of these are just a Graphical Interfaces helping you to set things without having to know anything about web server administration. They are commonly given as a courtesy on the shared hosting, but for a VPS or faster you need to pay extra for it. The fact of the matter is, none of them are needed for your web server, database server, or site itself to work. These panels only add extra clutter on your server and the things can work quite happily without it.
Chip in with 5 bucks and be amazed
So, lets get straight to business. Where is that super server for $5 we are talking about?
It is located on the Digital Ocean.
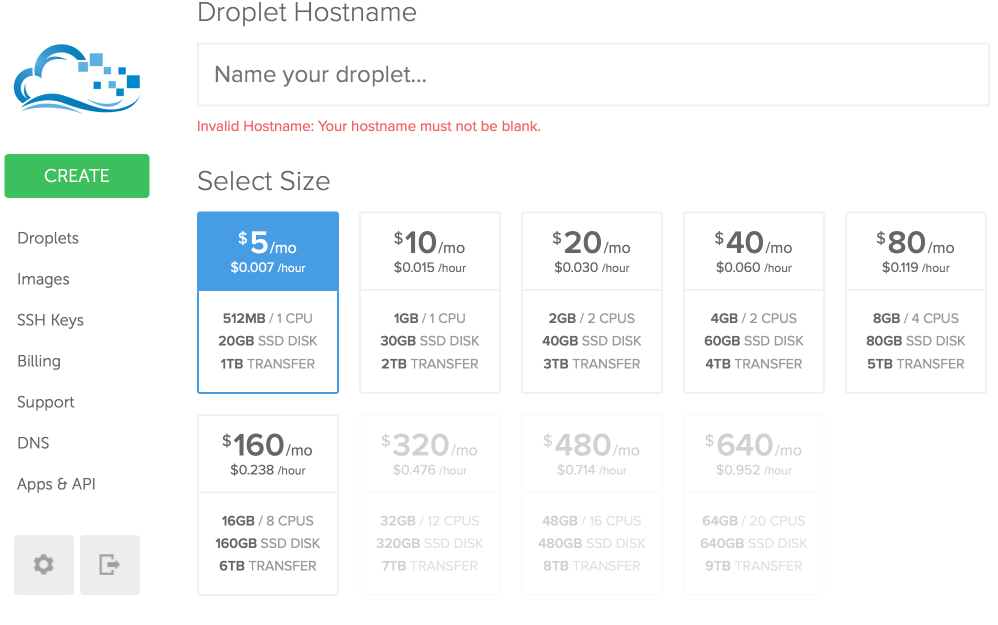
Login, and pay $5 which is minimum you need to launch the most basic droplet
As you can see, for just a $5 you get 1CPU, 512MB of RAM 20GB Solid State Disk and 1TB of transfer which is off the bat the better deal than anything you can find. Ofcourse, later you can easily increase your package. With minimum downtime, DigitalOcean does provide this possibility.
Give a name to your droplet, pick the package and the region that is closest to you,
You can leave "Available settings" unthicked
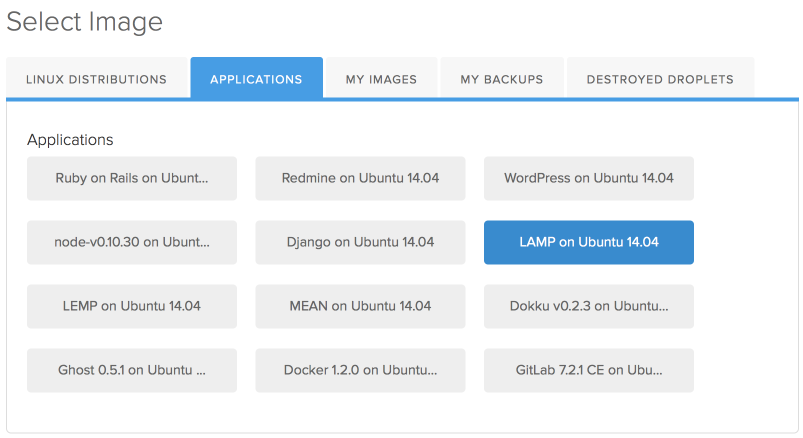
On the "Select image" area, switch to "Applications" tab and select "LAMP on Ubuntu 14.04"
LAMP stands for Linux, Apache, MySQL, Php and will automatically install all of these instead of you. It will save us some time installing the stack server that is available in Ubuntu.
Finally, create your droplet. Digital Ocean will immediately send you the email sending the
- IP address - you will use this to login at your server
- Root username - typically root
- Root password - Random string of text and numbers. You will be prompted to change this after first login
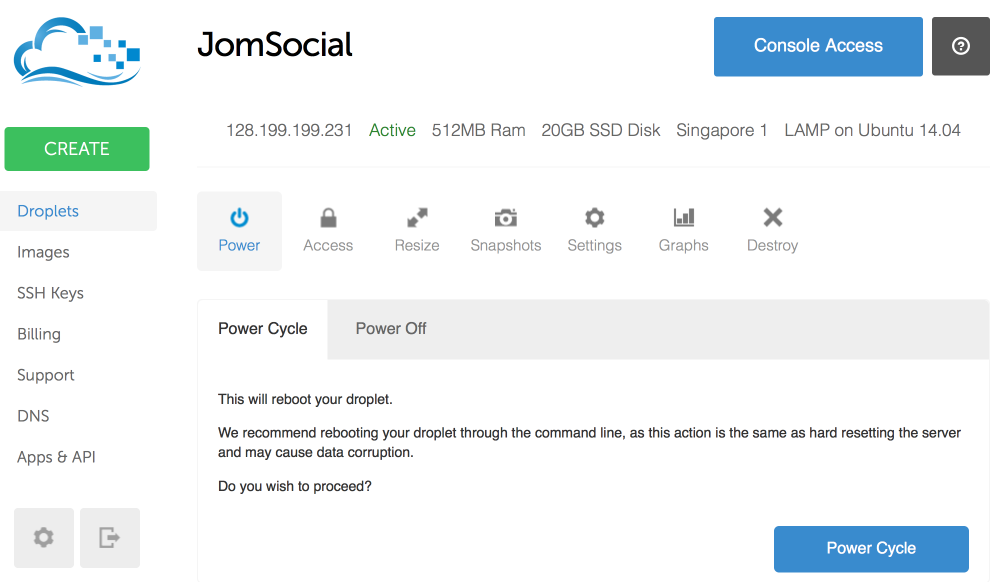
You will see something like this once your droplet is created
First login on the server
You can use the "Console Access" to login to your droplet, but we strongly advise you to use Terminal window.
Lets login to the machine by typing
ssh root@IP_OF_YOUR_DROPLET
- IP is sent to you in email you got when droplet is created.
If promted, type yes and press enter
You will be asked for the password. Use the password that DigitalOcean sent you in the email.
Once logged in, the server will require you to change the password. Follow the instructions and change the password. If all went well, you will have new root password for your server
Sinisas-MacBook-Pro:~ sinisakrisan$ ssh [email protected]
[email protected]'s password:
You are required to change your password immediately (root enforced)
-------------------------------------------------------------------------------------
Thank you for using DigitalOcean's LAMP Application.
Your web root is located at /var/www/html and can be seen from http://128.199.199.231/
The details of your PHP installation can be seen at http://128.199.199.231/info.php
Your MySQL root user's password is oti0mVK1gB
You are encouraged to run mysql_secure_installation to ready your server for production.
-------------------------------------------------------------------------------------
To delete this message of the day: rm -rf /etc/motd.tail
Last login: Tue Aug  5 15:08:41 2014 from 162.243.14.86
Changing password for root.
(current) UNIX password:
Enter new UNIX password:
Retype new UNIX password:
root@JomSocial:~#
Setup MySQL
Run this command in the terminal
mysql_secure_installation
This will start a series of questions to secure your database server.
It will ask you for the password. You can find it in the "Message of the day" at the terminal window.
Enter the password to start the process and follow the instruction.
If you're not sure what you need to set, answer all questions with y (yes)
When you finish, login to MySQL with
mysql -u root -p
Enter the root password and type
create database jomsocial;
followed by
exit
This will create database with name jomsocial
Finally, run the
rm -rf /etc/motd.tail
to remove Message of the day
Update software and edit php.ini
Update OS
Since we installed stack version of LAMP on Ubuntu, we need to update our operating system with new bugfixes and packages.
First, restart the server as this step is required to get new updates. Type:
reboot now
Login back to server and type:
sudo apt-get update
sudo apt-get dist-upgrade
Answer with yes and wait for your server to get updated with latest software.
Install cURL
To enhance the functionality of PHP, we can optionally install some additional modules.
cURL is one of them that is needed, but not installed with default LAMP stack
To see the available options for PHP modules and libraries, you can type this into your system:
apt-cache search php5-
To install specific module, type
sudo apt-get install module-name
Since we need cURL we type:
sudo apt-get install php5-curl
Restart the apache with
sudo service apache2 restart
Update php.ini
At this point, we have everything running, but we need to alter php.ini to comply with JomSocial requirements.
If you wan't, you can continue to be geeky and use Terminal editors such are nano or vi, but since this is a beginner tutorial, we are going to use SFTP to download files on our computer and then modify them with GUI text editors that we love
Simply login to FTP using ftp client like Filezilla using following credentials
- Server: sftp://YOUR_IP
- Username: root
- Password: your root password
Navigate to /etc/php5/apache2/ and grab the php.ini
Download it and edit to meet minimum system requirements and then upload it back.
Additional Modules and Cache handlers
Additional caching modules will help you speed up the site and massively increase the performance. You will find it hard to live without once you try them
Install Pagespeed module from Google
The goal of mod_pagespeed is to speed up your website. It does this by applying filters to a variety of files in order to reduce the number of trips the browser has to make to grab what it needs, to reduce the size of those files and to optimize the length those files are cached.
On Ubuntu server, we can install it using deb packages
wget https://dl-ssl.google.com/dl/linux/direct/mod-pagespeed-stable_current_amd64.deb
Once downloaded, use this commands to unpack and install it
sudo dpkg -i mod-pagespeed-*.deb
apt-get -f install
Finally, remove the downloaded package
rm mod-pagespeed-*.deb
That really is it. You can stop now and start using mod_pagespeed on the site by restarting the apache
service apache2 restart
If you want to further configure this module, use this article for a reference
Enable OPCache
Zend OPCache is already available in PHP, we only have to modify php.ini to enable it
Look for these directives, uncomment and change them according to following list
opcache.enable=1
opcache.enable_cli=1
opcache.memory_consumption=128
opcache.interned_strings_buffer=8
opcache.max_accelerated_files=4000
opcache.max_wasted_percentage=5
opcache.use_cwd=1
opcache.validate_timestamps=1
opcache.revalidate_freq=1
opcache.fast_shutdown=1
You can ignore other settings, or enable them to see if you will get any performance gain.
Enable Memcached
Memcached is a popular high-performance, distributed memory object caching system, generic in nature, but intended for use in speeding up dynamic web applications by alleviating database load
Installation of Memcached is pretty much straightforward
sudo apt-get update
sudo apt-get install php5-memcached memcached
Believe it or not, memcached is already completely installed and ready to go. Just restart the apache
sudo service apache2 restart
Setup Mail Server
Usually, people would install email server on the same computer where database and web server are already running. While this works, we do not advise to clutter the machine with more servers. Instead, use Gmail. It is really easy to set it up. Joomla! fully support it
Install and configure Joomla
From now on, you can use standard methods to download Joomla and upload it through SFTP however, we are going to do it much faster with terminal, using wget
First, change the directory to the web root
cd /var/www/html
Download Joomla
wget http://joomlacode.org/gf/download/frsrelease/19665/160051/Joomla_X.Y.Z-Stable-Full_Package.tar.gz
- note change the X.Y.Z to match the current version of Joomla.
Extract the package with
tar xvf Joomla_X.Y.Z-Stable-Full_Package.tar.gz
- again change the X.Y.Z to match the current version of Joomla.
Now just remove the original package as well as index.html file which protect your server with default apache page
rm Joomla_*.tar.gz
rm index.html
The only thing left to do before installation is to set ownership of the files, otherwise, Joomla will behave awkwardly
sudo chown -R www-data:www-data /var/www/html
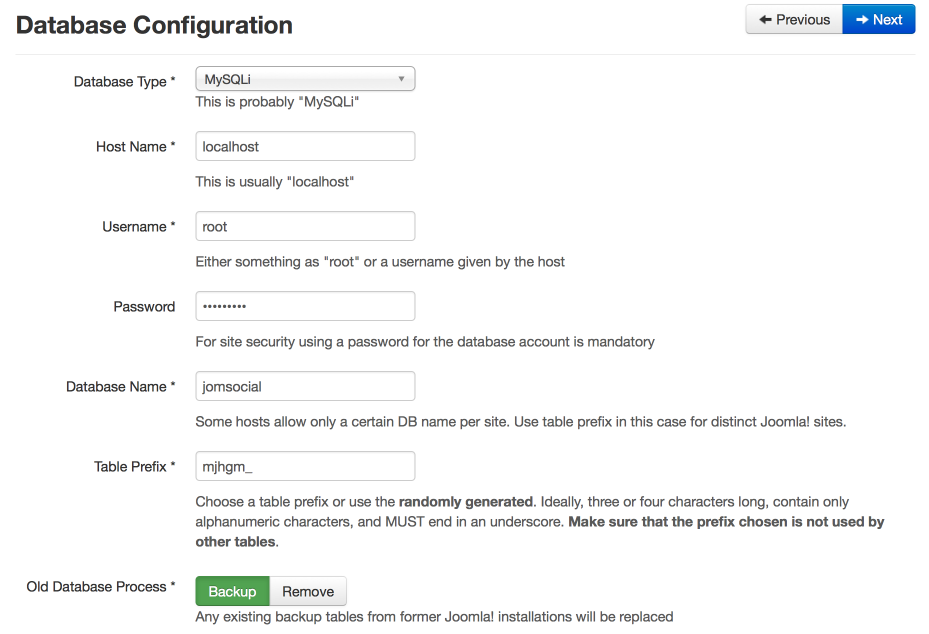
Now, visit your site frontend and proceed with Joomla installation as usual
For the testing it will work just fine. In Resources area at the bottom of the article you will find useful links how to secure your server and apply best practices.
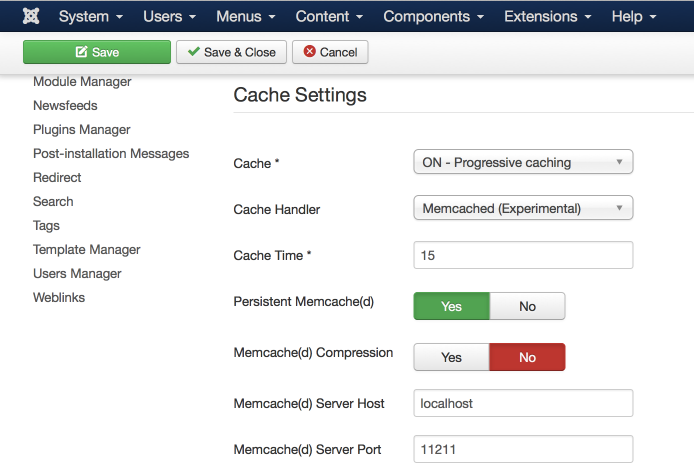
Immediately after Joomla is installed, go to Global Configuration and enable Memcached
After you save it, it might log you out, thats perfectly normal. Log back in and check if settings are respected.
Conclusion
Starting at just $5 you now have an super optimized server for best performance, packed with features that you can rarely find in any web hosting with CPanel. In fact, you might but in most cases, you'll have to ask hosting support for every minor configuration you want to make.
Resources
Soon


